A Soul of Fun
Commercial for Soul App
Soul App is one of the leading social networking applications in China among Gen Z. Soul was designed to encourage self-expression of diverse, rich and authentic content among Gen Z users. It aims to build a virtual playground for users to socialize, connect, and maintain relationships online.
Concept
Slogan
Emotion
Art Direction
A Soul of Fun
Vibrant
Y2K
Logline
This video uses a metaphor, comparing the world to a big arcade and the young souls to marbles within it, to express Soul App’s brand message of “share, explore, create, community” to Gen Z users.
Mood Board


Palette
Element

Storyboard
In the revised storyboard, I finalized four concepts: using a Newton’s cradle to represent content sharing between users, 3D pinball game to express a spirit of exploration and adventure, a bubble machine representing creativity and user-generated content (UGC), and a whale silhouette to symbolize harmonious atmosphere within the online community.


Style Frames


Working Process
Faux 3D Techniques
Due to the increasing trend of 3D images being commonly used in commercial motion graphics, in this project, I aimed to create effects that closely resemble 3D images more easily.
There are two main pathways to create that effect, one is by adding shadows, highlights, textures, etc. to objects through layer effects, masks, and expressions, to make them appear three-dimensional; the other is by blocking the objects in advanced 3D renderer/cinema 4D renderer to achieve realistic object behavior while applying graphic visual effects on 2D pre-compositions.
Pathway A: Fake it
1. Building an Object


Basically, it’s borrowing the sculpt - shade - material workflow in real 3D programs.
Shading
The basic logic to create a pseudo 3D look of an asset is to fully utilize the light-mid-shadow trick. Once an object has these three elements, it looks like 3D.
Material
When an object moves, the lighting does not change, surface material does (in low-poly projects). So the material should be created in a separate composition that can be controlled together with the movement, while the shading layer will be kept still in the form of a mask that just follows the object but does not move itself.
Master
Shape ControllControl the parameters of Shape Layer master control so it does not have to be pre-composed and can interact with other objects.
BCC Sphere Transition
It can morph and fold any surface into a spherical shape, and you can perform movement operations on the surface using the three parameters: tumble, spin, and rotate. It's particularly suitable for scenarios where Faux 3D spherical motion is needed.


2. Gradients & Layer Effects


Illusion of Space
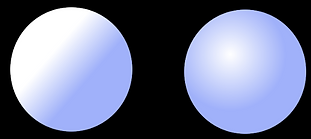
Using gradient effects can create the illusion of three-dimensionality. This is because the human eye tends to interpret value changes as light and shadow variations caused by changes in volume. Linear variations in the same direction can simulate the effect of global lighting direction, while radial gradients can mimic the concave and convex volume effects from front to back.

Bevel & Emboss
Based on the principle above, Adobe After Effects provides a series of plugins that allow us to achieve this effect conveniently and efficiently, such as the Bevel & Emboss effect in the layer styles. This effect adds a certain thickness of highlights and shadows to the edges of shapes, creating a simple faux 3D effect.
Linear Radial Bevel & Emboss
3. Realistic Movements

Physical motion is essentially the interaction between the attributes of a transform and is based on bezier curves as the fundamental function shape. Therefore, theoretically, all physical motion can be simulated through Expressions.
A fundamental relationship applied in this work is the connection between the displacement of the sphere and the rolling caused by static friction. It is known that there is such a relationship between the rolling angle and the displacement of the sphere: l=απr/180, which indicates a linear relationship between them. Therefore, I can directly link the rolling angle to the x-displacement and adjust the specific values in this linear function. Here, I used *0.8.
In addition, there are some preset features that can quickly help us link attributes, such as Transform - Auto Orient in the layer. This feature aligns the object's orientation with the tangent direction of its motion path, making it convenient to quickly position the object's rotation.
In addition, there are some preset features that can quickly help us link attributes, such as Transform - Auto Orient in the layer. This feature aligns the object's orientation with the tangent direction of its motion path, making it convenient to quickly position the object's rotation.


Auto-Orient
Recommended Plugins: Easy Bounce, Physics Now
Pathway B: Make it
1. Basic Modeling through Extrusion
At this point, I asked: Oh no, do I finally still have to model? Luckily, I only need to understand one basic concept here: Extrusion. I see it as adding thickness to a 2D shape. This is the most fundamental way of modeling in After Effects. Through extrusion, we can create simple geometric objects and build scenes directly within AE.
The image on the right shows the scene I created in After Effects. The process involves: first importing AI vector graphics, switching to the 3D renderer mode, then applying appropriate Extrusion to objects one by one, and adjusting spatial relationships. We can also assign different color values to the front and sides of the objects separately.


Original Extruded
2. Unwrap
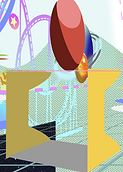
UnwrapOf course, for simple geometric shapes, there's another approach: the 2.5D method. You can imagine a cube as a paper box with six faces. Essentially, you only need to place the six faces in their respective positions, and it will appear as a cube. This method is suitable for the following scenarios: when there are not many objects or the objects are not complex, the camera angle is conventional, and the surfaces of the objects require precise spatial representation.
In the shot below, I used this method multiple times. If lighting and shading are not involved, usually, only three faces of an object are needed—for example, the base, the top surface of the base, and the side, as shown in the image.

Perspective A


Perspective B
This method is more complex compared to the method on the right. Firstly, each face needs to be created individually. Secondly, it involves alignment issues between the faces. Therefore, it is not recommended to use this method for all objects. Instead, it can be regarded as a supplement to the method on the right and can be applied to emphasize or detail a specific surface where necessary.
3. Pre-composition
Stylizing
Unfortunately, After Effects' 3D system does not support some of its original specialized features, such as layer styles and effects. Therefore, it is not possible to directly apply stylized rendering to models. Instead, the models need to be pre-composed into 2D graphics before further processing can be done.


Faces highlighted with colors Alpha Gradient Applied
ColorKey
The working principle is shown in the top-right image. In the previous blockout step, I first applied different colors to the surfaces requiring different treatments to distinguish them. Then, I used the effect "Color Key" to select the desired color, which made the selected area transparent.
On this basis, you can overlay any desired gradients or textures. Typically, I also create this texture as a composition for reuse. For example, in the image on the right, I created a gradient in a composition, and after applying Color Key, I could directly attach it to the building to serve as the building's surface.


Gradient Composition Applied
